Please remember that a password reset disk only works with local accounts and it doesn’t work with domain accounts. So, if you have setup a password on your computer for a local account then it will work flawlessly, but if you have used a domain account, then it won’t work at all. In Windows computers, domain accounts are usually linked with Microsoft account which is the default account type in Windows 8 and Windows 10. Resetting password of domain accounts is a bit tricky than resetting the password of a local account. Anyways, in this tutorial, we will show you how to make a password reset disk to bypass forgotten Windows 7/8/10 password. The procedure is pretty straightforward and should take less than 5 minutes even if you are a new computer user. It requires absolutely no technical or computer skills whatsoever. Just follow the instruction properly and you should be able to make a password reset disk in no time.
Solution 1: How to Make Password Reset Disk with Default Tool
Step 1. First, insert a USB flash drive on your computer and let your computer detect it automatically. If you are using USB flash drive for the first time then the computer may require to download and install the necessary driver files.
1 Solution 1: How to Make Password Reset Disk with Default Tool2 Solution 2: How to Make Password Reset Disk with UUkeys Windows Password Mate3 How to Use Password Reset Disk?
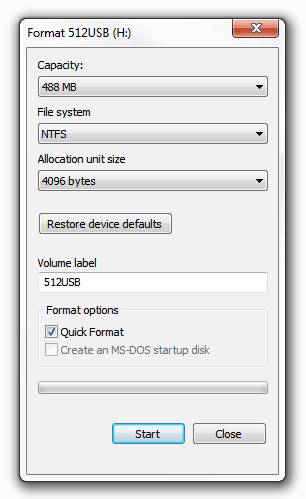
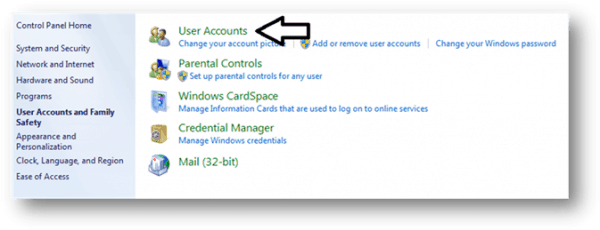
Step 2. Go to “My Computer” and right-click on the name of your USB flash drive and select “Format” and change the settings to exactly like in the following screenshot. Step 3. Now, click on start and launch “Control Panel”. Alternately, you can click on Start then type “Control Panel” and press Enter. Step 4. On your Control Panel, click on “Users Accounts and Family Safety” and from the right side panel, click on “User Accounts”. Step 5. From the left side panel, click on “Create a Password Reset Disk”.
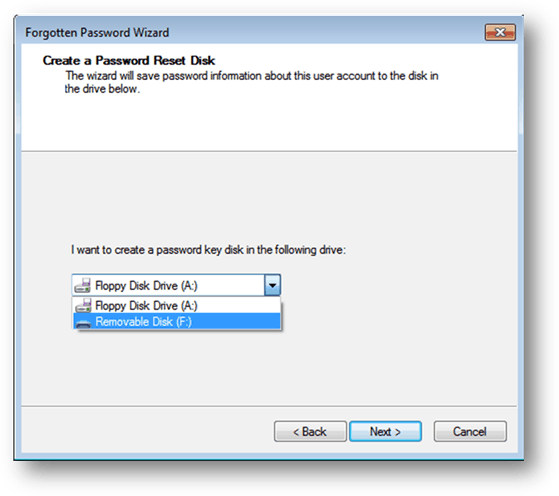
Step 6. A new Forgotten Password Wizard window will open, this is where the password reset disk will be created. Step 7. Click “Next” and select the name of your USB flash drive. Step 8. Click “Next” and the setup wizard will attempt to create your password reset disk. It may take some time, so wait patiently until the process is finished. It is recommended to keep your USB flash drive connected to the computer to avoid any kind of disturbance. Step 9. As soon the progress bar reaches 100%, click “Next” to finish the operation. That should be it. You have now created a password reset disk for your own computer. Please remember that whoever possess the USB flash drive will be able to reset the password of your computer easily. So make sure to keep it somewhere safe to avoid any unwanted password modifications on your computer.
Solution 2: How to Make Password Reset Disk with UUkeys Windows Password Mate
The problem with the above method is that it won’t help you reset the password on a different computer. That means if you forgot the login password of your computer and made a password reset disk with the above way, then it simply doesn’t work. So what is the answer to this sort of problem? Simply put, UUkeys Windows Password Mate is one of the best answers to fix the problem. After creating a password reset disk with UUkeys, you can reset the login password on various computers. The process is quite straightforward. First, download and install UUkeys Windows Password Mate and insert a USB drive into the computer. Now, click ‘Burn USB’ button to writing ISO file to the drive. It only takes 2-3 minutes. Now, you can take out the disk and use it to reset the password on Windows 10/8/7/Vista/XP.
How to Use Password Reset Disk?
In case if you have forgotten your Windows password, here is how to use the password reset disk to reset the password of your computer or laptop. Step 1. Insert the password reset disk USB flash drive on your computer and reboot it. Step 2. At the Windows welcome screen, click on the “Reset Password” link, it should appear right underneath the password input label. Step 3. Choose the drive where the password reset disk is placed. Step 4. Next, input your new password and confirm the changes. Step 5. If everything is done correctly, then you should be able to see a confirmation message that says “You’ve successfully reset the password for this user account.” Step 6. Now use the new password to enter into your computer. That’s how easy it is used to a password reset disk and at the same time, it gives a great leisure of relaxation to conquer a desperation moment. Wrap Up: Now you know how to make and use a password reset disk and recover your Windows computer password if you have ever forgotten it. Even if you update your computer with the latest version of Windows then also it won’t be a problem and you can use the same disk to reset your password. Do remember that this tutorial is only valid for local accounts and not for domain or root accounts. Hopefully, you guys enjoyed and found this useful.